Create and customize your website using the WordPress block editor
Table of Contents:
Installing your theme is easy! After downloading you should have a theme-name.zip file.
WordPress Method
- Go to Appearance » Themes in the WordPress Dashboard and click on the “Add New” button
- Click on the “Upload link”, select the short-news-pro.zip file and click “Install Now”
- Activate the theme
Ftp Method
- Log into your site via FTP
- Browse to your folder located at wp-content/themes
- Unzip the theme-name.zip folder and upload the folder to your server
- Log In to WordPress and go to Appearance » Themes
- Find the theme and click to activate
If your theme is out of date, you will see a notice on your WordPress Dashboard. You’ll be able to update your theme using the traditional WordPress update tools.
You will get update notifications only if you have an active Theme License. Here you find Theme License Faq.
There are a few different ways to manually update your theme. We recommend using a child theme if you are going to customize your theme files, as this simplifies updating your parent theme.
Download latest version
Sign in to our website and download the latest version of your theme.
If you don’t have an account, you can create a new one with the email that was used to purchase the theme.
Upload the new version
The easiest way to manually update your theme is to upload it via the WP dashboard.
However, if you try to upload a new version of a theme that is already in your site’s themes directory, you will get an error.
The reason is that you already have a theme folder on your server with the same name as the folder inside your ZIP file.
You can do one of the following:
1. Delete the theme on your server
- Go to Appearance » Themes
- Activate one of the default WordPress.org themes
- Delete the old theme (Make sure you make a backup just in case something goes wrong)
- Upload new version via Appearance » Themes » Install Themes » Upload
- Activate the new version
If you have done any customizations to your theme files, these customizations will be lost if you use this method.
2. Rename the folder (via FTP)
- Log in to your site via FTP or cPanel
- Navigate to wp-content/themes/ and find your old theme
- Rename your old theme something like “theme-old” (replacing “theme” with the name of your theme).
- Upload your new theme folder
The old and new versions of the theme will both appear in the themes interface, but you will be able to distinguish them by their folder names and version numbers.
Edit the content of specific site pages using one of the following options:
Through your WordPress.com dashboard:
- Start from your site’s dashboard
- Click on “Pages“
- Either click the “Add new page” button or click on the title of an existing page you want to edit
Or through the Site Editor:
- Start from your site’s dashboard
- Navigate to Appearance » Editor » Pages
- Either click the “Add New Page” button to create a new page or click a page name and click the pencil icon to edit an existing page
To write new posts and edit existing posts on your blog, follow these steps:
- Start from your site’s dashboard
- Click on “Posts“
- Either click the “Add new post” button or click on the title of an existing post you want to edit
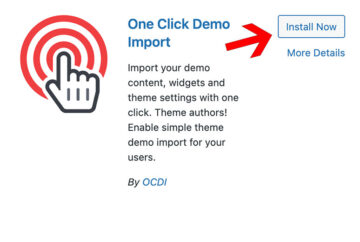
You can easily import the pre-built demo using the One Click Demo Imports plugin.
- Visit your site’s dashboard
- Navigate to Appearance » Getting Started page
- Click on the “Install Plugin” button
- Alternatively, go to Plugins » Add Plugins and enter “1 click demo import” in the “Search Plugins” field

- In the “Add Plugins” page click on the “Install now” button
- Activate the plugin
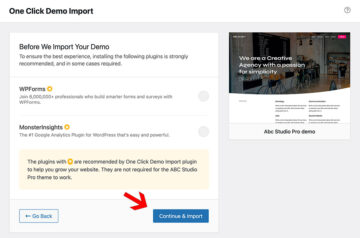
- After activating the plugin, navigate to Appearance » Import Demo Data
- Click on the “Import Demo Data” button
- Click on the “Continue & Import” button at the bottom of the page
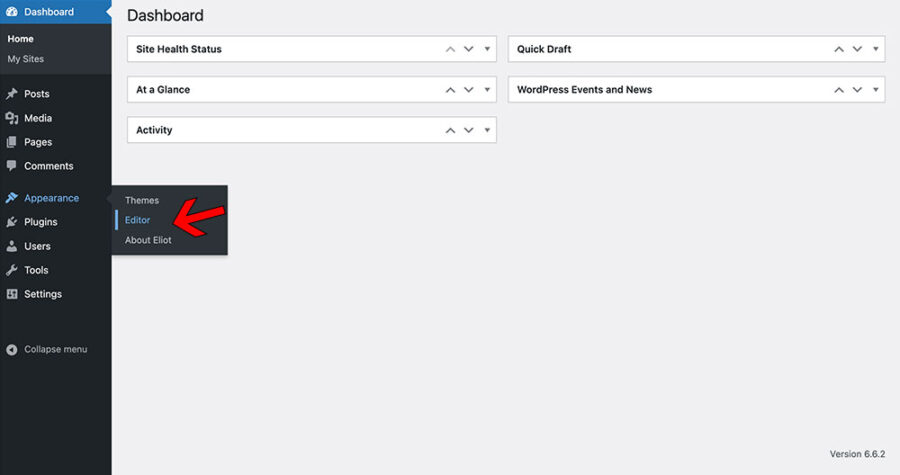
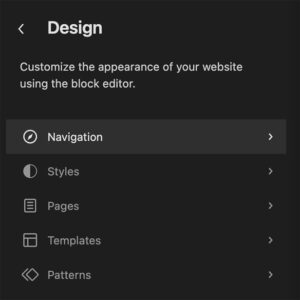
To edit your website’s overall structure, navigate to Appearance » Editor
Here, you can edit your site’s logo, header, footer, menus, styles, and templates (which control the layout used by pages and posts).
- Edit the Header
- Edit the Footer
- Upload your Site Logo
- Edit Your Site Title
- Navigation Menu
- Customize colors and fonts
- Add custom fonts
- Templates
- Customize Page Templates
- Edit the Default Homepage
- Set a Static Homepage
- Use Pre-Made Page Layouts
- Patterns
Edit the Header
The header is the top part of a website that typically shows the site title, a logo, and a navigation menu.
The header is a template part. Once you edit this template part, the changes will apply to all pages of your site where this header is shown.
You can customize your header using the following steps:
- Visit your WordPress dashboard
- Navigate to Appearance » Editor to open the Site Editor
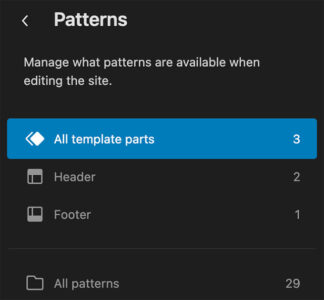
- Click Patterns to view all of your site’s template parts
- Under the “All template parts” section, select the Header section to see all of the template parts categorized as a header
- Select the Header template part that you want to edit
- Click the preview of the Header template part to close the left sidebar and open the editing interface
The footer is the bottom part of a website that typically shows the site title, credits, social links and a navigation menu.
The footer, like the header, is a template part. Once you edit this template part, the changes will apply to all pages of your site where this header is shown.
You can customize your header using the following steps:
- Visit your WordPress dashboard
- Navigate to Appearance » Editor to open the Site Editor
- Click Patterns to view all of your site’s template parts
- Under the “All template parts” section, select the Footer section to see all of the template parts categorized as a footer
- Select the Footer template part that you want to edit
- Click the preview of the Footer template part to close the left sidebar and open the editing interface
Upload your Site Logo
To add a logo to your site using the Site Editor, follow these steps:
- Visit your site’s dashboard.
- Navigate to Appearance » Editor to open the Site Editor
- Click Patterns to view all of your site’s template parts
- Scroll down below the list of pattern categories to the “Template Parts” section and select the Header template part
- Select the Header template part that you want to edit. (Your theme may include multiple variations of your header to choose from here)
- Click the preview of the Header template part to close the left sidebar and open the editing interface
- In the Header template part editor, select the Site Logo block (usually, in the Header of our themes there is a Site Logo block) or click the + block inserter to add the Site Logo block
- Click the upload icon in the Site Logo block to add your logo.
- Make any adjustments to the size and position of the logo
- Click the “Save” button to publish your changes
Please see this detailed guide on using the Site Logo block.
Edit Your Site Title
The Site Title, along with the Site Tagline, defines your website’s identity in search engines and social networks.
You can change the site title at any time using the following steps:
- Visit your WordPress dashboard
- Navigate to General » Settings
- Replace the text in the “Site title” field with your new title
- Click the “Save settings” button
You can view, manage, and modify your menus using the Site Editor Navigation, without having to find them in a specific template in the site editor. If your site has several menus, they will all be listed together and you will be able to edit them from there.
- Visit your WordPress dashboard
- Navigate to Appearance » Editor » Navigation. You will see all your menus listed there
- Once you select an individual menu, you will be able to edit it. Please see this detailed guide to edit your site’s menus via the Site Editor
Add a Navigation Block
Usually, a Navigation block is added to a site’s templates, most commonly through the Header or Footer template part.
The Navigation Block allows you to edit the structure and design of your site’s navigation menu.
- Visit your site’s dashboard
- Navigate to Appearance » Editor
- Select the Template or Template Part you want the navigation menu to appear
- Click the + Block Inserter icon
- Use the search field in the block inserter to search for “navigation”
- Click the Navigation block to add the block to your site
When you first add the Navigation block and don’t have an existing menu, it will contain the Page List block. By default, the Page List block displays all your site’s published pages, and new pages are added automatically.
Once the Navigation block is added to your header or footer, you can customize it following this detailed guide on using the Navigation block.
Customize colors and fonts
Styles (in the Site editor) is a new feature that allows you to customize the look of your site with different colors, typography settings, and layout options. This guide will show you how to use Styles to give your website a consistent look.
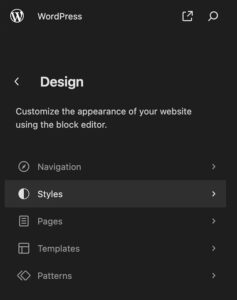
To access Styles Settings:
- Visit your site’s dashboard
- Go to Appearance » Editor
- Select Styles from the left-side menu
- Click the pencil icon to then open the full Styles settings
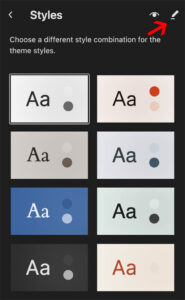
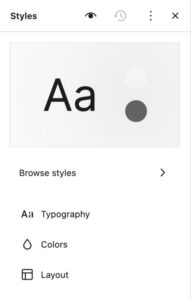
In the Styles settings, you will see the following options:
- Browse styles (on some themes only)
- Typography
- Colors
- Layout
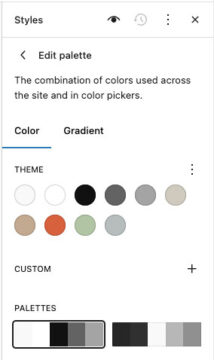
Colors
- Click Colors to open the Color panel. At the top, you will find the color palette used by your active theme. You will also find the list of elements whose default global color can be customized through the Color settings panel
- Click Palette to open the Palettes panel. Here you can set the color options available by default
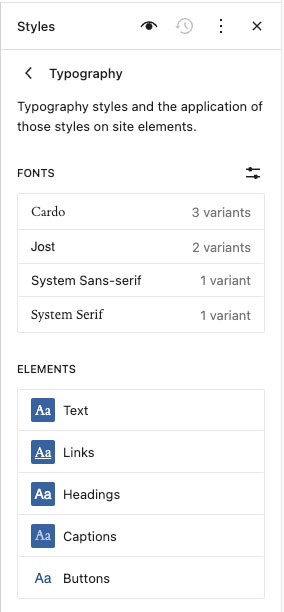
Typography
- Click Typography to open the Typography panel. Select the element you want to customize and it will open up the Typography panel for that element
- You can change the typography settings including font type, font size, appearance, and line height
For more information, please follow this detailed guide on using Styles.
Add custom fonts
WordPress 6.5 ships with the Font Library, a feature that allows you to manage your fonts directly from the Site Editor.
- Visit your site’s dashboard
- Go to Appearance » Editor
- Select Styles from the left-side menu
- Click the pencil icon to then open the full Styles settings
- Click Typography to open the Typography panel. You should see a settings icon, which has a tooltip of Manage fonts
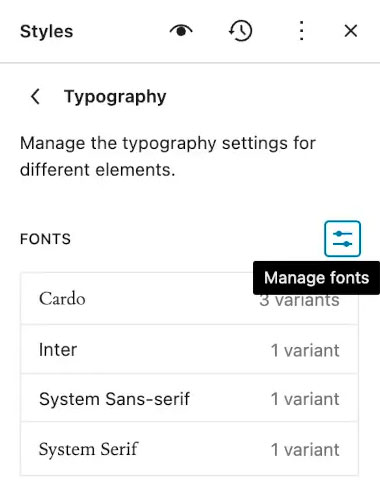
Click the Manage fonts button, a new Fonts modal will appear that shows a few tabs.
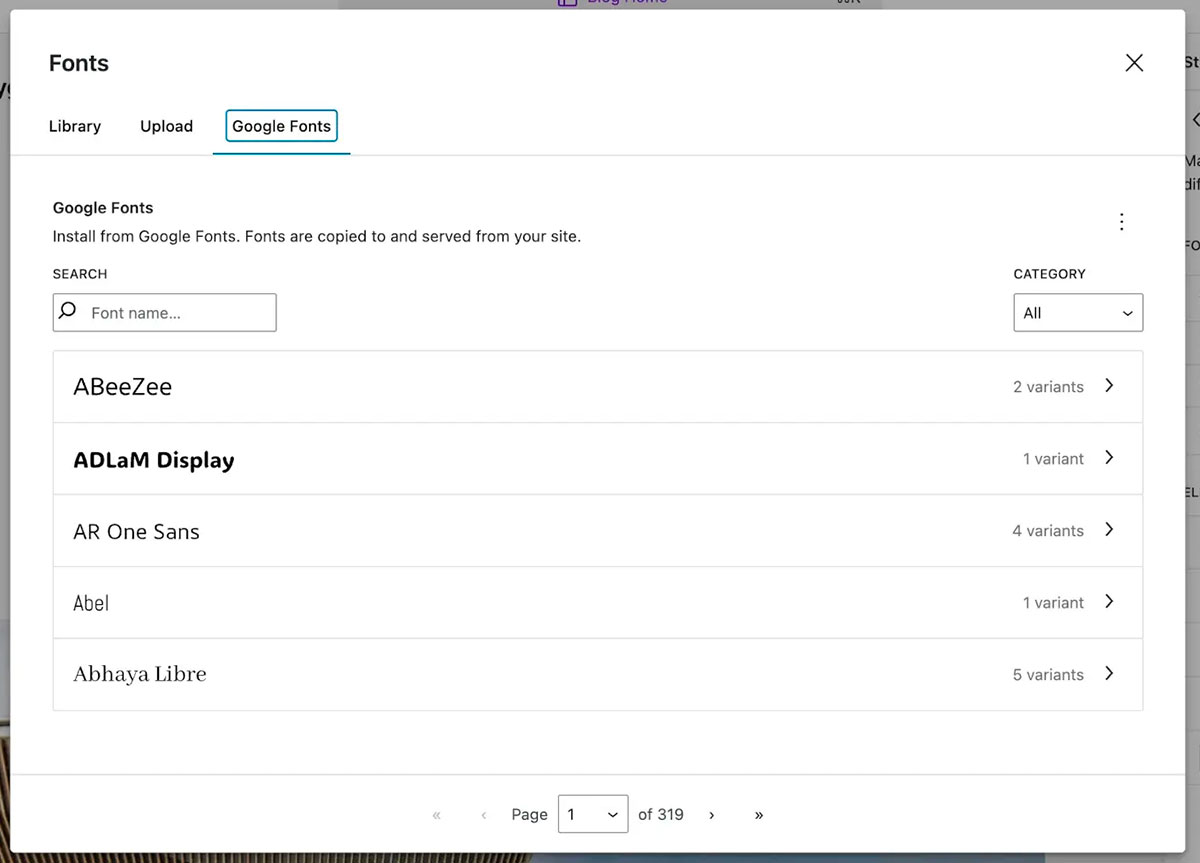
The three tabs shown are:
- Library: This will display all of the fonts from your theme and those installed via the Font Library
- Upload: Allows you to upload font files directly from your computer
- Google Fonts: This is the default font collection that ships with WordPress, letting you install any Google Font
When you select a font from the Google Fonts collection, a new panel appears that allows you to install variants of the font you want for your website.
Templates
A template controls the layout and structure of posts, pages, or specific page types on your site.
The most common templates are listed below:
- Home template: to display the site’s home page if your site is set up to display the latest posts on the home page
- Index template: When a Home template is absent, some themes use the index template as the default home page
- Page template: Controls the layout of standard pages of your site, such as an About or Contact page
- Single template: This template styles your individual blog posts
- Archive template: This is the design for category pages, tag pages, and other archive pages
How to access templates
- Visit your site’s dashboard
- Navigate to Appearance » Editor
- Click on the “Templates” option.
- Select “All templates” to see a full list of your site’s templates with descriptions of their purpose.
Customize Page Templates
The template controls how the page is displayed. You can identify the template a page is using by following these steps:
- In your site’s dashboard, click Pages.
- Click a page’s name to open that page in the editor.
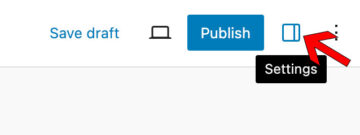
- In the Page settings sidebar on the right, under Summary, locate the Template option. (If you do not have the sidebar on the right, click the Settings icon in the top right corner to bring up the settings. This icon looks like a square with two uneven columns)
- Note the name of the template the page is using
- Under the Summary section, click the name of the template. A popup will appear.
- To change template, click on “Swap template“
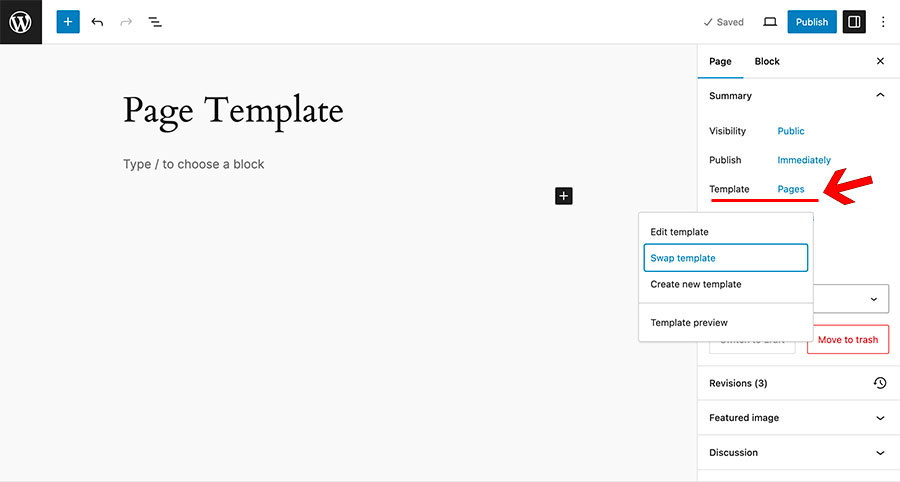
Our block themes come with a “Blank Template” that displays only the Page content, and a “Blank Template with Header/Footer” template that displays Header, Page content and Footer without Page title.
Edit the Default Homepage
The default homepage is the homepage design that comes with your site’s theme. This guide will show you how to find and edit the content and design of the home page.
To find and edit the default homepage:
- Visit your site’s dashboard.
- Click on Appearance » Editor
- Click anywhere on your site on the right side to open the editor and close the left sidebar
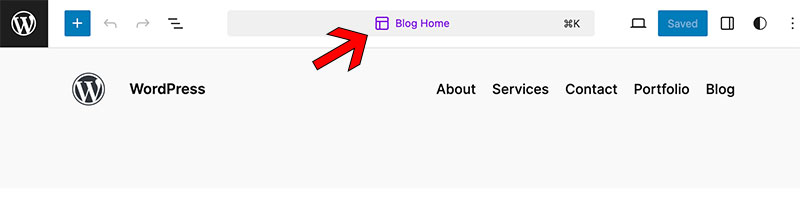
- You are now viewing the homepage template, which may be labeled as Home, Index, or Front Page at the top of the screen:
First, it’s helpful to understand the overall layout of your site’s homepage template. To see this, open List View by clicking the icon at the top left of the screen that looks like three horizontal lines above each other:
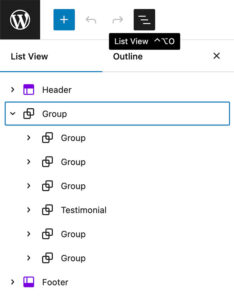
Here, you’ll see all of the elements (known in the WordPress editor as blocks) of your homepage. A typical default homepage template will contain the following elements:
- Header: The header contains elements such as a site title, logo, and menu.The header is a template part that appears across the entire site. Therefore, any edits to this header will apply to all pages on your site where the header template part is inserted.
- Content: Everything between the header and the footer is the main content of your homepage. You will likely see text and images, organized into Groups, Columns, and more. If your theme displays blog posts on the homepage, you will likely find a Query Loop block here too.
- Footer: The footer contains elements like a site title, contact information, and credits. The footer is a template part that appears on every page. Therefore, any edits you make to this footer will apply everywhere on your site where the footer template part is inserted.
How to add your content
- To change any text, click on and type the new text you want to show
- To change any image, click on and click Replace in the toolbar displayed above the block
Set a Static Homepage
A homepage is the front page of your website. By following the steps in this guide, you can control which page your visitors see first when they visit your site.

- Visit your site’s dashboard
- Navigate to Settings » Reading in the sidebar
- Locate the “Your homepage displays” setting at the top of the screen
- Choose “A static page” option (Select a custom home page that you have created, as well as a separate page to display blog posts. Only published pages (not drafts) will appear in these drop-down lists.)
- Click the “Save Changes” button to save
Use Pre-Made Page Layouts
Page layouts are pre-designed pages with placeholder content that you can replace with your own text or images. This guide will show you how to make use of page layouts to easily publish beautifully designed pages on your website.
To view the collection of page layouts you can use on your site, follow these steps:
- From your site’s dashboard, click on Pages
- Click on “Add new page“
- A window will appear for you to browse through the different Page Layouts, such as About, Portfolio, Services, Contact, Blog, Store, and more (depending on the theme in use)
- Once you find a layout that you like, click it once to apply it to your new page
Alternatively, you can insert a Page layout from the Patterns tab:
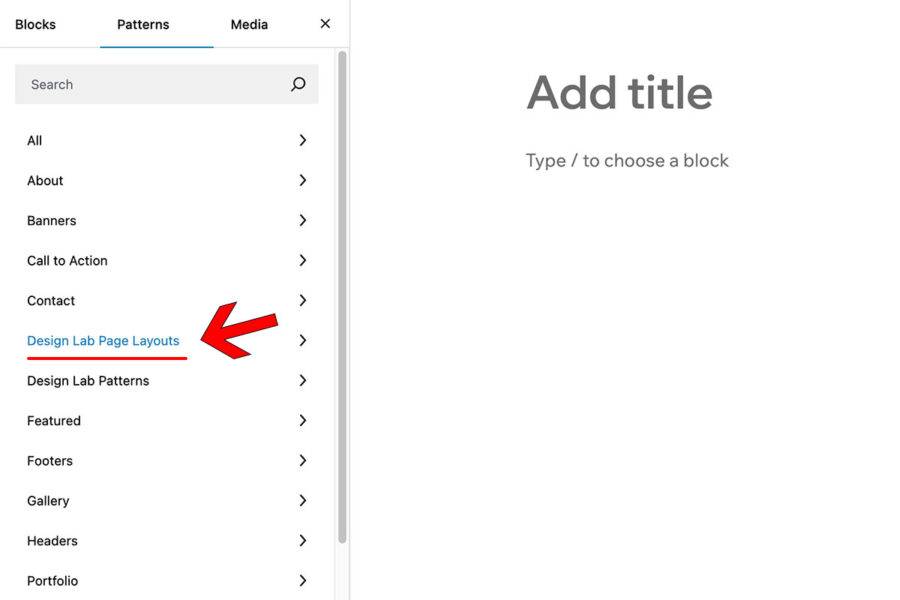
- Visit your site’s dashboard
- Go to Pages or Posts and click any page or post to edit it
- In the editing screen, click the + Block Inserter in the top left corner
- Click on the Patterns tab
- Browse through the patterns. Click on “Design Lab Page Layouts” to view our collections of Page Layouts
- Once you find a layout that you like, click it once, and it will be added to your page at the location of your cursor
The most common Page layouts are (depending on the theme in use):
- Homepage
- About page
- Services page
- Contact page
- Portfolio page
- Blog page
- Store page
How to add your content
- To change any text, click on and type the new text you want to show
- To change any image, click on and click Replace in the toolbar displayed above the block
Patterns
Block Patterns are a collection of predefined blocks that you can insert into pages and posts and then customize with your own content. Using blocks and patterns, you can quickly build a beautiful website without using a page builder.
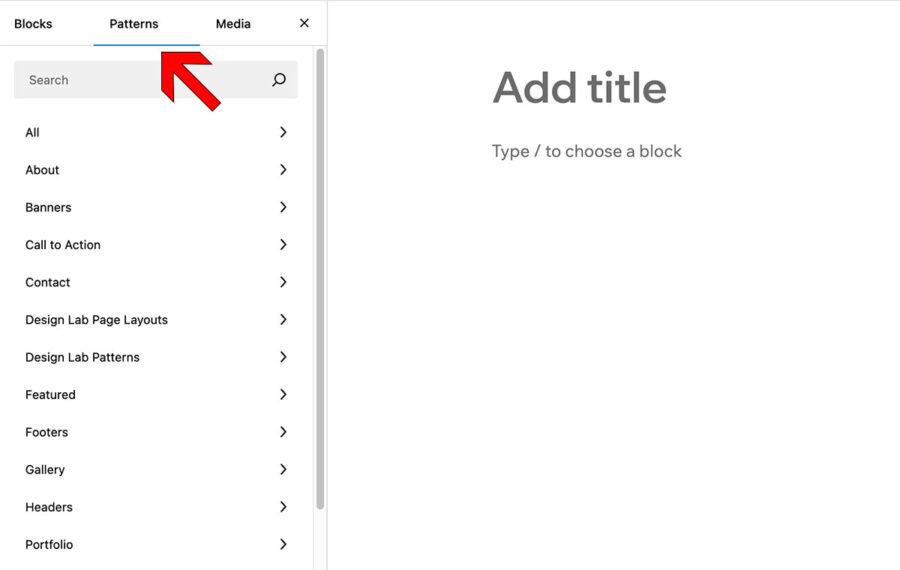
To browse the block patterns available and add them to a page, take these steps:
- Visit your site’s dashboard
- Go to Pages or Posts and click any page or post to edit it
- In the editing screen, click the + Block Inserter in the top left corner
- Click on the Patterns tab
- Browse through the patterns. You can click to view collections of patterns within a specific category like Text, Gallery, Header, Forms, and many more. You can find our collections of patterns under the “Design Lab Patterns” tab.
- Click on any pattern once, and it will be added to your page at the location of your cursor
- To change any text, click on and type the new text you want to show
- To change any image, click on and click Replace in the toolbar displayed above the block
Please follow this detailed guide on using Block Patterns.
Blocks are the components for adding content in the new WordPress block editor. There are several blocks available within WordPress that you can easily add to your post or page. Please visit this page for a complete list of blocks.